


Custom Heat Stamps: Leave a Lasting Impression on Wood, Leather, and More
In the world of craftsmanship and branding, custom heat stamps are a game-changer. Whether you’re a woodworker, leather artisan, small business owner, or DIY enthusiast, a heat stamp adds a distinctive, professional, and permanent mark to your creations.
From branding handmade leather wallets to marking wooden furniture with a logo, heat stamping offers durability, precision, and an artistic flair. In this blog, we’ll explore the benefits of custom heat stamps, how they work, and why they are essential for makers looking to leave a lasting impression.
What is a Custom Heat Stamp?
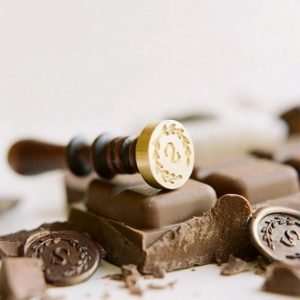
A custom heat stamp is a metal engraving that, when heated, burns a design onto a surface like wood, leather, or even metal. These stamps, often made from brass or stainless steel, are customized with a logo, initials, or intricate designs, allowing businesses and artisans to brand their products uniquely and professionally.
Popular uses for heat stamps include:
🔥 Wood Stamping – Perfect for marking cutting boards, furniture, and custom wooden crafts.
🔥 Leather Stamping – Ideal for branding wallets, belts, journals, and handmade leather goods.
🔥 Metal Stamping – Used for engraving on tools, jewelry, and industrial parts.
🔥 Plastic & Other Materials – Some heat stamps can be used on plastics or wax for a custom embossed effect.
Why Use a Custom Heat Stamp?
✔ Professional & Permanent Branding – Unlike stickers or ink, heat-stamped designs are long-lasting and won’t fade.
✔ Personalized Craftsmanship – Add unique initials, logos, or decorative elements to make your creations stand out.
✔ Versatility & Multipurpose Use – Works on multiple materials, offering endless creative possibilities.
✔ Increased Product Value – A custom brand mark enhances perceived quality and authenticity.
How to Use a Custom Heat Stamp
Step 1: Choose the Right Material
Before stamping, make sure the material can withstand the heat.
- For wood – Hardwoods like oak and maple give crisp, clean burns.
- For leather – Vegetable-tanned leather absorbs heat better than synthetic or treated leather.
- For metal – Special heated branding tools or engraving machines may be required.
Step 2: Heat the Stamp
The stamp must be heated evenly for the best results. Common heating methods include:
- Torch heating – A simple and effective method for traditional branding irons.
- Electric branding irons – Provide consistent heat, making them ideal for professional use.
Step 3: Test Before Stamping
- Always test on a scrap piece before applying the stamp to your final product.
- Adjust the heat as needed to prevent excessive burning or an unclear impression.
Step 4: Apply Even Pressure
- Press the stamp firmly and evenly onto the material.
- Hold for 3-5 seconds (varies based on material and heat level).
Step 5: Let It Cool & Finish the Look
- Allow the stamped area to cool before handling.
- If needed, lightly sand or condition the surface for a refined finish.
Choosing the Right Custom Heat Stamp
When ordering a custom heat stamp, consider:
✅ Design Complexity – Simple, bold designs work best. Fine details may not transfer well.
✅ Stamp Size – Choose a size that fits your branding needs.
✅ Material & Durability – High-quality brass or stainless steel ensures longevity and even heating.
✅ Heating Method – Electric branding irons are best for frequent use, while torch-heated stamps are ideal for occasional projects.
Final Thoughts
A custom heat stamp is more than just a tool—it’s a signature of craftsmanship and quality. Whether you’re looking to brand your business, add a personal touch to gifts, or create stunning handmade products, heat stamping helps you leave a lasting, professional impression.